

5 Embroidery Stitches to Use Instead of the Running Stitch When Visibly Mending Your Clothes
- Melissa Galbraith
- Aug 26, 2025
- 6 min read


Mending is a great way to repair and breathe new life into clothing you love. For me, I hate having to break in a new pair of jeans, so I'd much rather mend mine with a playful patch or design than have to go through the hassle of buying a new pair.
As mending and visible mending have become more and more popular, the most common type of mend showcased is usually sashiko or the running stitch mend. That's because this mend is relatively easy to get started with and can be used to create a wide variety of interesting and intricate patterns.

But did you know there are other stitches you can use to mend your clothes with too? If you're wanting to branch out and try something new with your mending, use one or all five of these embroidery stitches when working on your next visible mending project.
Supplies you'll need for visible mending
5 Embroidery Stitches You Can Use for Visible Mending
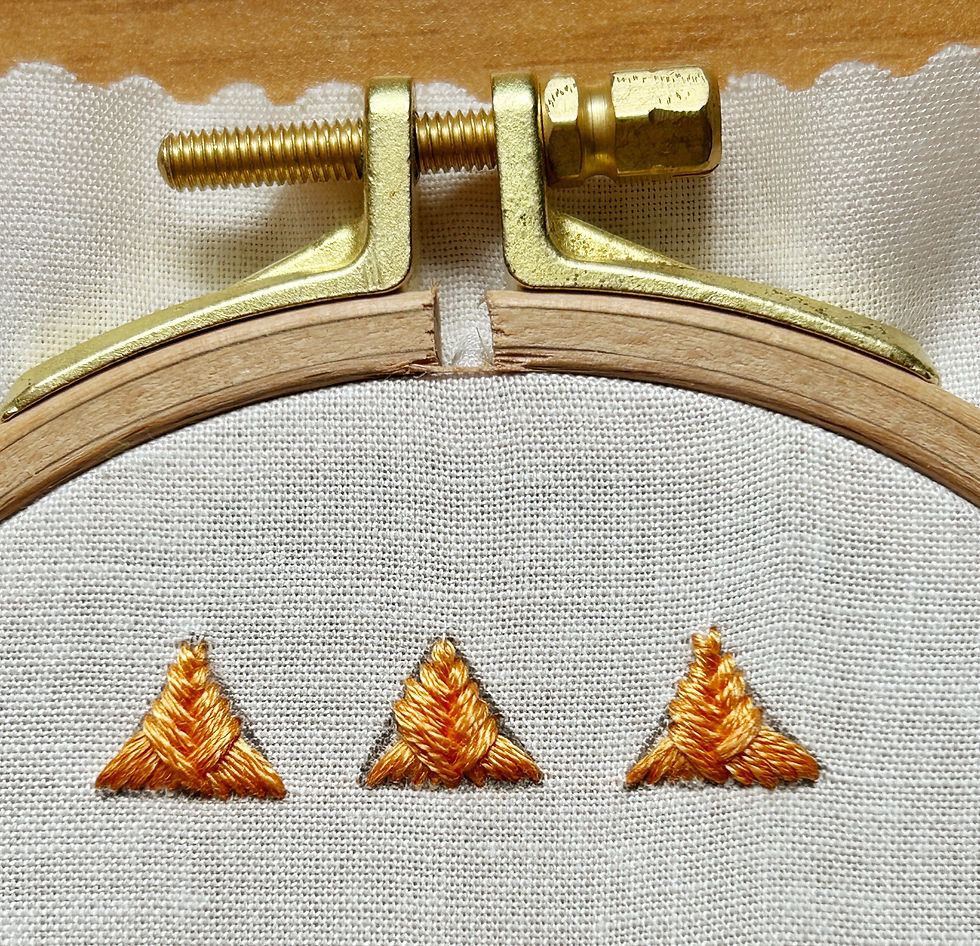
Arrowhead
The arrowhead stitch creates a triangle with threads that overlap themselves down the center of the triangle. It's great for small holes.
How to create the arrowhead stitch:
Draw an equilateral triangle onto the fabric.
Next, bring the needle up in the bottom left corner of the triangle.
Now bring the needle down slightly to the right of the top point of the triangle.
Next, bring the needle up slightly to the left of the top point of the triangle, next to the previous stitch, and bring the needle back down through the fabric in the bottom right corner of the triangle.
Now repeat creating stitches that are close together. Bring the needle up inside the previous stitch on the left side of the triangle.
Create a straight stitch to the right outer edge of the triangle. This stitch should overlap the previous straight stitch.
Then bring the needle up on the left outer edge of the triangle.
Now bring the needle back down at the bottom right of the triangle, inside the previous straight stitch. Continue until the triangle is filled in.

Buttonhole Mend
The buttonhole mend can be used to fill a wide variety of shapes and sized spaces. This stitch creates a web-like fill with thread to fill in a hole or cover a worn area.
How to create the buttonhole mend:
Draw an outline slightly larger than the space being mended.
Bring the needle up through the fabric to the front. Hold the thread towards the inside of the shape.
Then bring the needle back down through the fabric along the outline of the shape, about 1/8-1/4 an inch away from the previous stitch, and pop the point of the needle back up through the fabric about 1/8-1/4 and inch into the shape being filled on the front of the fabric.
With the needle still in the fabric, slide the working thread behind the needle.
Gently tug, creating a U of thread on the front of the fabric.
Now add the next connected stitch. Pop the needle into the fabric about 1/8-1/4 an inch away from the previous stitch. Place the working thread behind the needle then gently tug, creating another connected U.
Continue all the way around the shape.
On the second row, bring the needle down into the top of the first row, connecting them together.
If there is no fabric to connect the needle to, slide the needle through the U loop of thread, and don't tug as tightly.
Continue to the center of the shape, then bring the thread to the back and knot it off when complete.
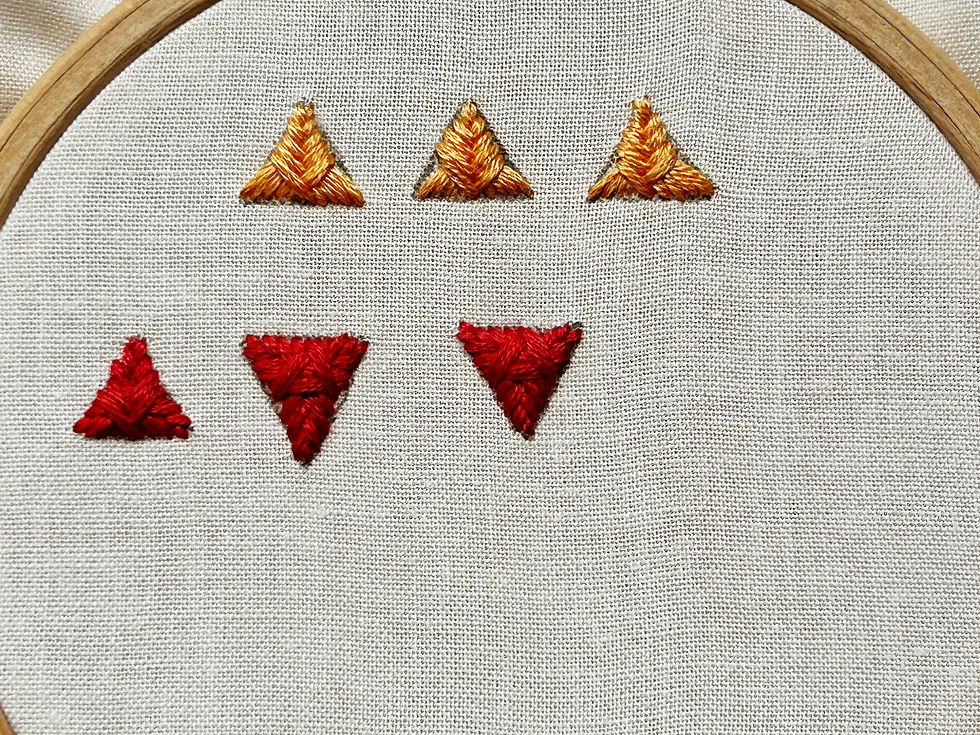
Crows Foot
The crows foot stitch is another triangular stitch that overlaps itself. This stitch works toward the center in its pattern. It is also great for small holes.
How to create the crows foot stitch:
Draw an equilateral triangle onto the fabric with the point towards the bottom.
Next, bring the needle up in the bottom point of the triangle.
Now bring the needle down slightly to the left corner point of the triangle.
Next, bring the needle up just below where the needle went into the fabric in the left corner of the triangle, and then make a straight stitch across to the right corner of the triangle.
Now bring the needle up slightly above where the needle went into the fabric in the right corner of the triangle and make a straight stitch to the bottom point of the triangle, bring the needle down slightly to the left of the first stitch.
Now repeat, always bringing the needle up on the outer edge of the triangle.
Bring the needle up slightly to the right of the bottom point of the triangle and make a straight stitch across to the top outer edge.
Then bring the needle back up through the triangle on the left outer edge, make a straight stitch across to the right outer edge.
Then bring the needle up on the top outer edge of the triangle and bring the needle down on the left outer edge of the triangle.
Repeat until the triangle is filled in. The triangle will fill towards the center.

Needle Weaving/ Darning
The needle weaving or darning stitch is a woven stitch that creates a grid-like pattern, similar to weaving. It's great for filling in large or small areas and can be used to patch or reinforce sections when mending.
How to create the needle weaving stitch:
Start by bringing the needle up from the back of the fabric at the bottom corner of the section that will be filled in.
Make a straight stitch across to the opposite side and gently tug the thread flush with the fabric.
Leave a small space away from the end of the stitch that was just made, and bring the needle back up through the fabric.
Then make a stitch across to the other side of the shape.
Continue filling the shape with straight stitches in parallel lines that are close to one another.
Now weave in the perpendicular rows. Bring the threaded needle up through the fabric near the bottom corner of the shape.
Flip the needle around and weave the eye of the needle over, under, over, under, the lines of thread, working across to the opposite side of the shape.
Gently tug the thread so that is it pulled through the rows and is flush with the fabric.
Then bring the needle down through the fabric to end the row.
To start the next row, bring the needle back up through the fabric slightly above the previous row.
Weave the thread through the threads in an alternating pattern from the previous row.
Continue adding woven rows until the section is filled in.
Tip: If the vertical and horizontal rows are space out, there will be spaces in the grid. For a tighter grid and more solid fill, stitch the rows closer together.
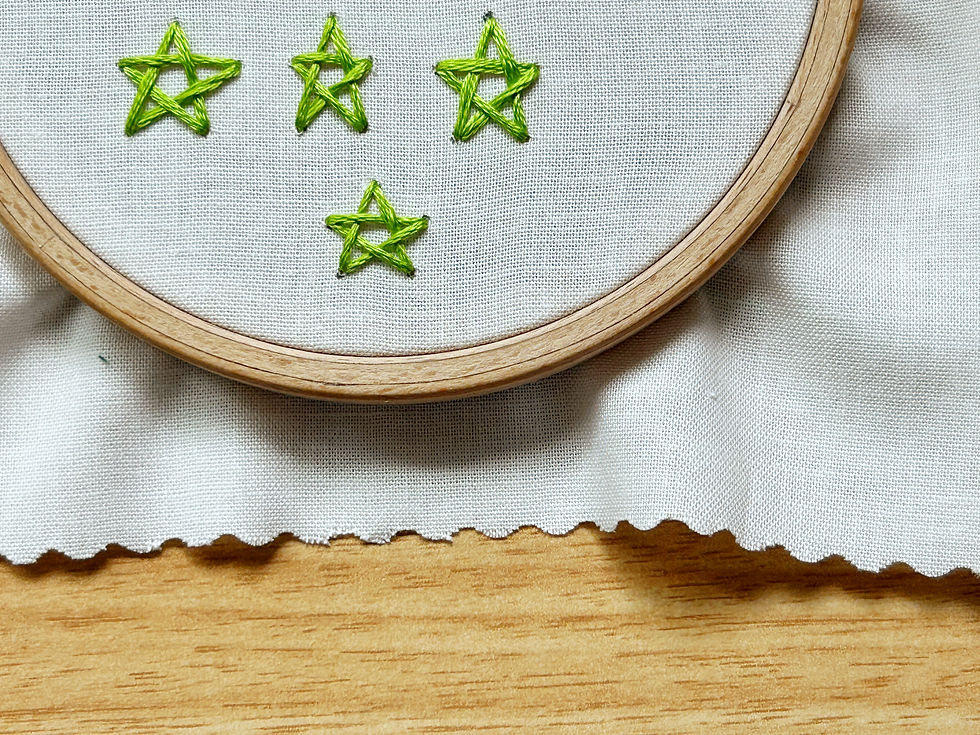
Star Darn
The star darn stitch creates a star pattern with each line of the star overlapping itself. It's good to use for mending small holes.
How to create the star darn:
To start the star darn stitch, it is helpful to draw 5 dots where the points of the star will be on the fabric.
Then bring the needle up through the fabric at the top point of the star.
Next, bring the needle down into the fabric at the bottom right point of the star.
Now bring the needle up at the top left of the star and bring the needle back down at the bottom right of the star again.
Bring the needle back up at the top left of the star, slide the needle underneath the straight stitch on the right, and bring the needle down in the top right of the star.
Now bring the needle up in the bottom left of the star, slide the needle underneath the left diagonal straight stitch and bring the needle back down in the top right of the star.
Bring the needle back up in the bottom left of the star, slide the needle underneath the horizontal straight stitch of the star, and bring the needle back down at the top point of the star.
This creates one star darn.

***Thanks for reviewing my recommendations. This post contains affiliate links. Should you purchase an item listed, I may receive a small portion of the sale.***


Comments