

3 Ways to Visibly Mend Your Clothing
- Melissa Galbraith
- May 11, 2023
- 4 min read


Visible mending and upcycling are great way to repair well-worn clothes and make them like-new again. If you know me, then you know I love upcycling my clothes with hand embroidery and repairing small holes and stains with visible mending. If you haven’t checked out my post on why mending matters, be sure to give that a read.
Now I’m sure you clicked on this post because you want to learn three ways to visibly mend or upcycle your clothing, so let’s dive on in.
What you’ll need to get started:
A garment to mend (If you’re unsure of what kind of garment to start with, read my post titled 9 Things to Know Before Visibly Mending a Garment first)
A sashiko or hand embroidery needle
Thread: sashiko, perle cotton, or crochet thread are all great for mending
Ruler or sashiko stencil patterns


Running Stitch Mends
The running stitch is a simple yet effective way to repair worn areas of fabric, patch a section, or add decorative elements to a garment. What is the running stitch? It’s a basic embroidery and mending stitch where the needle moves evenly in and out of the fabric to create a dashed line. If you’ve seen sashiko mending and embroidery, then you’ve seen the running stitch.
I love to use this stitch to repair worn areas on garments before they’ve gotten a whole. Simply stitch rows of the running stitch next to one another in an offset, snake-like lines. Once the first set of rows are complete, stitch another set of rows perpendicular to the first set. This set of rows will overlap the first set and can create designs like stairs, plus signs, stars, and more.
Along with reinforcing worn areas of fabric, the running stitch can also be used to patch garments. Before stitching over the area that needs mending, pin a similar piece of fabric to the back of the garment with sewing pins. Then add your running stitch lines as usual.


Needle Weaving or Darning
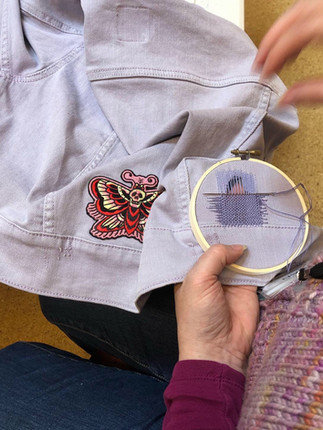
This technique was traditionally used to darn socks and can also be used to mend woven fabrics such as denim. Needle weaving reinforces the fabric and creates a sturdy woven patch. You can either match your thread to your fabric or choose colors that will stand out.
I like using this mend on areas that are seriously frayed or have small holes. This mend is similar to weaving in that tension is important to keeping it taught. I place my garment in an embroidery hoop so that the mended area is centered. Next, create the vertical lines for this mend by stitching long straight stitches close together. Similar to the running stitches, these stitches will snake along the back of the garment so that there aren’t any long pieces of thread on the back of the mend.
Once the vertical straight stitches are complete, it’s time to weave the horizontal rows. Starting at the bottom left corner, create the first horizontal line by weaving the needle over, under, over, under until the needle and thread are fully across the vertical lines. Bring the needle back down into the garment on that side of the mend, then come up slightly above that row to make the next. The next row will be woven in the opposite pattern of the previous row: under, over, under, over. Repeat this until the entire section is filled in.
For this mend I find it’s helpful to use two different colors of thread. Using one will have you going cross-eyed after a while because the rows are so close together.


Hand Embroidery
Hand embroidery is often seen as an embellishment on clothes, but it can also be used to upcycle and mend clothes too. I can’t tell you how many times I’ve gotten cooking grease on a comfy shirt or found small holes in a garment that I love. Embroidery is a great way to cover up these small holes and stains while breathing new life into a garment.
I love using my Peel Stick and Stitch patterns to embroider on clothing because it makes it easy to transfer the design and also acts as an additional stabilizer when stitching.
The two most important things to keep in mind when embroidering your clothes are:
Use short stitches. Long stitches will pop away from the fabric causing them to snag and ruin the garment.
Keep the back tidy. The back of a garment or textile that will be used should be as neat as possible. Much like the front, the back will also be seen and used. If the stitches on the back are messy, it will be hard to use the garment and can ruin the embroidery on the front with snags or tangles.
If you want to learn how to use hand embroidery to upcycle and repurpose your own clothes, you can join me for an upcoming workshop!
***Thank you for reviewing my recommendations. This post contains affiliate links. Should you purchase an item listed, I may receive a small portion of the sale.***


Comments