

How to Hand Embroider a Vegetables On a Tote Bag
- Melissa Galbraith
- Jun 15, 2023
- 5 min read


The weather is finally starting to warm up. The days are starting to be sunnier. The trees are starting to look greener. All of this means summer and Farmers Market are just around the corner. I love shopping at my local Farmers Market because they have some of the freshest vegetables and my favorite fruits.
My local Farmers Market always encourages shoppers to bring their own bags and containers for produce when shopping. I have so many reusable bags, but I often forget to grab one when I’m headed out the door. I’ve tried all sorts of tricks, like putting them by my jacket or in the trunk of my car to remember a bag, and yet somehow, I still end up without a bag a majority of the time.
In an effort to remember to bring my own bag, I decided to stitch one with vegetables. This delightful veggie tote bag now reminds me that it’s exactly what I need for a trip to the Farmers Market. It’s probably also a good visual cue to remind me to buy more vegetables while I’m out shopping.
Want to stitch your own vegetable tote bag?
Here’s what you’ll need to complete this project:
Tote bag
Assorted embroidery thread
Hand embroidery needle
Embroidery hoop
Scissors

Let’s get started:
First, lay your tote bag on a flat surface. Then decide where you want your designs placed on the bag. When you’re set on the design, simply peel off the back of the vegetable peel stick and stitch patterns. Then place the pattern sticky side down onto the bag.
Tip: I found it helpful to lay the patterns on top of the bag and move them around until I had a composition, I was happy with.

Next, place the tote bag in the embroidery hoop. Unscrew the top of the embroidery hoop so that the inner ring easily pops out. Since tote bags are usually a little thicker than standard cotton fabrics used for hand embroidery, you may want to unscrew the top more than usual. Slide the inner ring inside the tote bag. The design that is being stitched should be centered on the inner ring. Then sandwich the outer ring on top of the inner ring and tote bag. Gently tug the tote bag along the outside of the hoop while tightening the top screw. It is important to make sure the tote bag fabric is taught, like a drum.
Tip: If the whole design doesn’t fit, that’s ok, just make sure the portion that is being stitched is towards the center of the hoop.

Now choose your thread colors. When choosing my thread colors for this project, I decided to stick to more realistic vegetable tones, however, you can choose whatever colors you’d like! Maybe you want a neon blue carrot or pastel pink kale?
When embroidering I like to split apart my thread into different weights. This allows for thick and thin lines. Stitching with all 6 strands of thread can also be hard to work with and is a little bulky. To split your thread, start by cutting an arm’s length away from the skein. Next, pinch the thread between your fingers and gently pull one piece out of the bunch at a time. Pull straight up, so that the thread bunches underneath your fingertips. Pulling more than one strand of thread from the bunch at a time usually leads to the thread tangling and knotting on itself.
For my vegetable tote designs, I used 3 strands of thread.
With your thread split apart, now it’s time to thread the needle. Wet the ends of the strands of embroidery thread so that they stick together. Then hold the end of the thread bunch as close as you can to the end of your fingertips. Now gently glide the thread through the needle’s eye. Once threaded, leave one side of the thread longer than the other. If you’re having trouble threading your needle, you might try a needle threader or a needle with a larger eye.
Before we can start stitching, we need to knot the thread end. The easiest way I have found to knot my thread is with a quilter’s knot. To do this, hold your needle pointy side up in your dominant hand. Then take the very end of the longer side of your thread and cross the tail in front of your needle. This will make a plus sign or cross. Hold the long tail with the thumb that is holding the needle. (Keep this in your dominant hand). In your other hand, you will have a loop of thread. Wrap the top part of the loop around the needle 3 times. Pinch the wrapped thread between your thumb and finger that is holding the needle. Then let go of the loop of thread in your other hand. Next, gently pull the wrapped thread tight and push it down, over the needle’s eye and down the strand of thread until it knots at the end of the longer side of the thread. When pushing the wrapped part of the thread down to the end of the long end of the thread, be sure to pinch the eye of the needle so that it doesn’t come unthreaded in the process.

Now let’s stitch! For this design I used 2 hand embroidery stitches, the first stitch is the split back stitch.
The split back stitch is a short flat stitch that is made in a line. This can be used to fill a space if the lines are next to one another. It’s great for outlining and filling space.


Here’s how to embroider the split backstitch:
Begin by pulling the needle and thread up through the fabric a stitch’s length away from where you want your first stitch to start (about ¼ of an inch).
Then bring the needle back down to the edge of the section line you are filling.
Leave a space away from the stitch that was just created and bring the needle back up through the fabric.
Next, bring the needle and thread back down through the middle of the previous stitch, splitting the strands of the stitch apart. Just like the back stitch, the split back stitch leaves a space that is filled in by creating a backwards stitch.
The second stitch I used was the French knot. This stitch creates a small, raised circle on the front of the fabric. French knots are great for adding detail and texture.


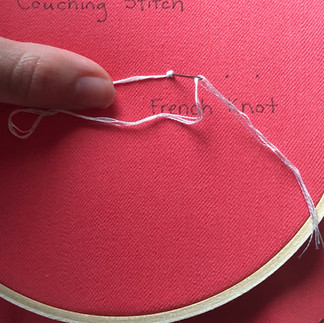


Here’s how to embroider the French knot:
To start, pass your threaded needle from the back of your fabric to the front.
Hold your needle in your dominant hand and use your other hand to wrap the thread taught around your needle two or three times. The more you wrap the thread, the bigger the French knot will be.
Keeping the thread taught, pass the needle back through your fabric next to where you previously came up through the fabric.
Pull tightly until the thread is knotted on the front. It is important to keep your thread taught throughout this process, otherwise, your French knot will end up with extra threads and loops.
When one vegetable or portion of the pattern is finished, move the hoop to another section and continue stitching. Be careful not the sew the side of the bag together or catch a strap while stitching.
When all the patterns are stitched, remove the embroidery hoop from the tote bag. Run the tote bag under hot water. This will help the vegetable peel stick and stitch patterns dissolve. Sometimes you might need to gently scrub the pattern away with a finger while running the design under the water.

Once the patterns are washed away, dry the tote bag. I usually dry my embroidery flat on top of a towel, but because I stitched on both sides of my tote bag, I decided to stuff the inside of the bag with a towel and stand the bag up to air dry. This helped the bag keep its shape and allowed both sides to dry evenly.
Finally, enjoy your tote bag! Leave a comment to share where you plan to take your vegetable tote bag.


Your step-by-step guide for embroidering a veggie-themed tote bag is so helpful! The colorful veggies and techniques you've shared make it seem achievable even for a newbie like me. Can't wait to give it a try and flaunt my farmer's market style. Thanks for the fantastic DIY inspiration!