

Add Flair to Your Embroidery with 3 Variations of the Back Stitch
- Shannon

- May 5
- 4 min read

Back Stitch
Back Stitch on its own is one of the most popular stitches in hand embroidery, for good reason: not only is the stitch at its most basic infinitely adjustable (change the length of your Back Stitches and see how magical the difference is; change the thickness of your thread and notice the same thing!), but there are many playful variations on the basic stitch that will have you reaching into your embroidery tool bag for the humble Back Stitch again and again!
First things first: the Back Stitch itself. The name of the stitch tells you how to work it: you make a stitch, you go under the fabric ahead one stitch's length, and then you create a stitch by going BACK to where you finished your first stitch. The rest of the stitching is a fun game of stitcherly leapfrog; you are always traveling ahead a stitch UNDER the fabric to come up and create your next stitch by going BACK. Easy-breezy, lemon-squeezy!
How to stitch the Back Stitch:
Begin by pulling the needle and thread up through the fabric from the back to the front about ¼ an inch away from the start of the line.
Insert the needle at the end of the line, filling in the space.
From underneath the fabric, space the needle out the length of the next desired stitch (~1/4 inch or less), pull the needle up through the fabric.
Then insert the needle into the fabric in the hole of the previous stitch.
Repeat until the line is created.

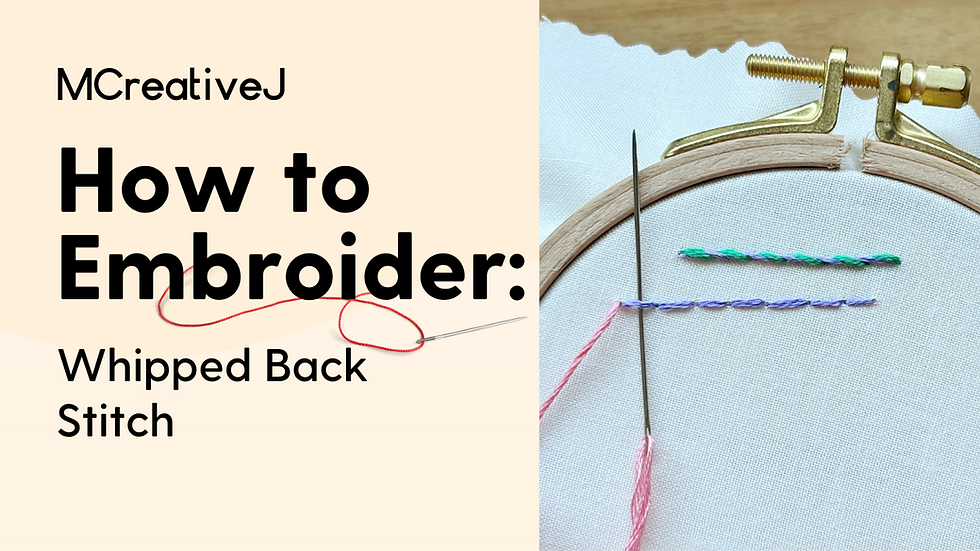
Variation 1: Whipped Back Stitch
The Whipped Back Stitch gives a delightful candy cane effect, and is a great outlining stitch. You can use two vastly-different colors, as shown on the sample, above, or use two similar colors for a more subtle effect.
How to stitch the Whipped Back Stitch:
To start, you'll need a line of back stitches.
Now whip the back stitch. Bring the needle up through the fabric, at the start of the line in the hole of the first back stitch.
Slide the needle underneath the first back stitch. Be sure to only slide under the thread and not stitch through the fabric.
Gently pull the thread so that it is flush with the fabric.
Then slide the needle underneath the next back stitch in the row. Be sure to slide the needle in the same direction so that the whipped thread wraps around the back stitches.
Work down the line of back stitches until the end. At the end of the line, bring the needle into the fabric in the hole of the last back stitch.

Variation 2: Split Back Stitch
The Split Back Stitch can look almost like a chain stitch or even knitting! For the most balanced look, use an even number of strands of thread for this stitch.
How to stitch the Split Back Stitch:
Bring the needle up through the fabric a stitch’s length away from the start of the first stitch. I usually aim for ~1/4-1/8 inch.
Insert the needle at the end of the line, filling in the space.
Leave a space away from the stitch that was just created and bring the needle back up through the fabric.
Next, insert the needle into the middle of the previous stitch, splitting the strands of the stitch apart. Just like the back stitch, the split back stitch leaves a space that is filled in by creating a backwards stitch.
Stitch until your desired line length is created.

Variation 3: Pekinese Stitch
The Pekinese Stitch is a stitch that combines two stitches: the back stitch and a variation of the whipped stitch. With this stitch you can create a beautiful looped design that would be great of boarders, intricate stems, fluffy bird wings, and more.
How to stitch the Pekinese Stitch:
To start, stitch a line of back stitches.
Next, bring the needle up through the fabric slightly above and in the middle of the first back stitch.
Slide the needle underneath the second back stitch. Do not go through the fabric. This thread will be entirely worked on the front of the fabric.
Then slide the needle underneath the first back stitch, creating a loop of thread on the front of the fabric that is worked through the first two back stitches. Use the needle point to adjust the thread as needed.
Next, slide the needle underneath the third back stitch, then back underneath the second.
Continue along the line creating loops of thread around the back stitched line.
When all of the back stitches are wrapped, insert the needle into the fabric on the same side of the line it was started on.
With these three Back Stitch variations, we are merely dipping your stitcherly toes into the infinitely-modifiable stitch that is the Back Stitch. We hope this piqued your creativity, and added a bit of pizazz to your embroidery!
Looking for more helpful embroidery tips, supplies, and hands-on workshops?


Workshops
Join Melissa Galbraith of MCreativeJ for a hands-on workshop! Melissa makes hand embroidery easy with a wide variety of embroidery classes. Classes are beginner-friendly to advanced and will walk you through various stitches, techniques, and designs.


Embroidery Books
Want a great hand embroidery reference? Try one of Melissa's hand embroidery books! Each book is great for beginners and breaks down materials, stitches, techniques, and projects for you.


Comments