

How to Embroider: 3 Ways to Finish Your Thread End in Hand Embroidery- Video and Step by Step Tutorial
- Melissa Galbraith
- Sep 11, 2025
- 3 min read


How to End Your Thread in Hand Embroidery
There are a couple different knots you can use to finish your thread on the back of your project when embroidering. Three ways I like to use include sinking the thread, as well as creating a slip knot or a square knot. Use this DIY video and these step-by-step tutorials to learn how to tie off your thread in any of these ways when embroidering.
What you'll need to end your thread:
3 Ways to End Your Thread Video
3 Ways to End Your Thread Step-by-Step Tutorials
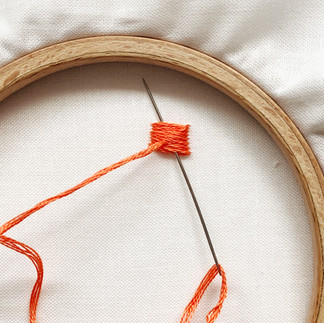
Sinking the Thread
1. Sinking thread is a way of hiding the thread under stitches on the back of the fabric without making a bulky knot. This type of finishing technique can be helpful when the back will be exposed or a knot will be irritating (like in a shoe). Instead of creating a knot, run the needle underneath nearby stitching in a few different directions so that the thread knots on itself but it doesn’t disrupt the stitches on the back of the embroidery.


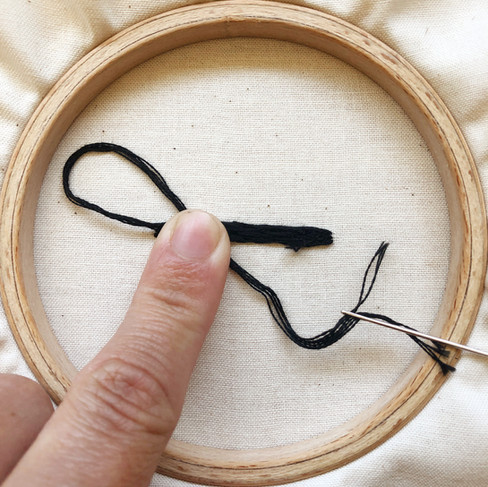
Slip Knot
1. For the slip knot, I recommend having at least 3 inches of thread to work with. The shorter the thread is, the harder it is to create the knot. This is my go-to knot for most embroidery projects. Take the thread that is coming out of the back of the embroidery and cross it over itself so that it makes a loop.

2. Bring the needle (or tail end of thread) through the loop. Where the thread crosses is where the knot is. Use your fingers, working the crossed thread down so that it’s flush with the back of the fabric.

3. When the thread is flush with the fabric, hold it in place with your finger. Then gently tug the thread so that the loop becomes a knot. Cut away any extra thread.


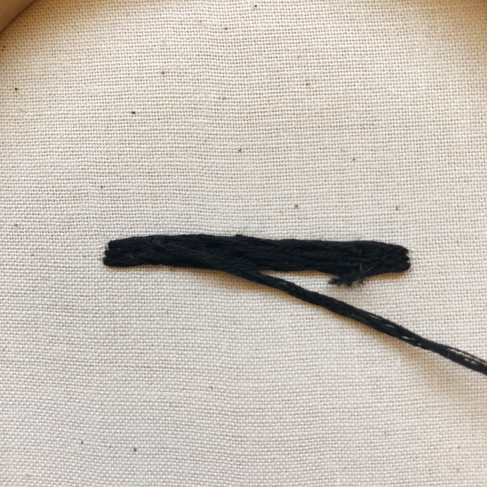
4. If you are struggling to get the knot flush with the fabric, try holding the point of the needle inside the loop where you want the knot to tie off. As you tug the loop of thread closed, the needle will help guide the knot to the designated location. Once the thread is tight around the needle, remove the knot and tug the thread. Then trim away any excess thread.

5. If the knot doesn’t end up flush with the fabric, you can also run the needle underneath nearby stitches to tug the knot underneath them and hold it in place. Then cut away any additional thread.
Square Knot
This knot is like tying your shoes. It can be used for short lengths of thread or if you’re having trouble reaching the place where the knot needs to be. Note- You need at least 2 strands of thread to create this knot. For sections that are harder to reach, having extra thread to hold onto will make this process easier.

1. Unthread the needle and unwind the thread so that the thread can be split into two sections. The sections don’t need to be even. Cross the thread over itself, creating a loop.


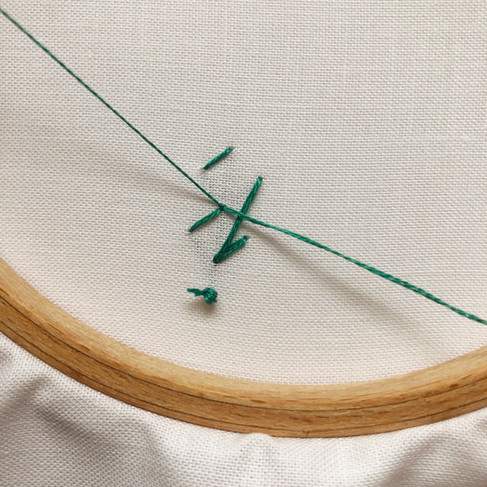
2. Slide the tail end of the thread in front through the loop. Then tug the two ends so that the crossed thread is flush with the fabric.


3. Then repeat. Cross the thread over itself again, creating a loop. Slide the tail end of the thread in front through the loop. Then tug the two ends so that the crossed thread is flush with the fabric. Cut away any excess thread.
Looking for more helpful embroidery tips, supplies, and hands-on workshops?


Workshops
Join Melissa Galbraith of MCreativeJ for a hands-on workshop! Melissa makes hand embroidery easy with a wide variety of embroidery classes. Classes are beginner-friendly to advanced and will walk you through various stitches, techniques, and designs.


Embroidery Books
Want a great hand embroidery reference? Try one of Melissa's hand embroidery books! Each book is great for beginners and breaks down materials, stitches, techniques, and projects for you.

***Thank you for reviewing my recommendations. This post contains affiliate links. Should you purchase an item listed, I may receive a small portion of the sale.***


Comments