

How To Turn Your Embroidery Into A Pennant Flag
- Melissa Galbraith
- Jan 17, 2021
- 4 min read

Pennant flag aren't just for college dorm rooms! They're beautiful ways to display positive messages and inspiration in your office, kitchen, entry way, or kids room. I'm always looking for new ways to add fiber art and specifically embroidery to my decor. Pennants are a great way to add an extra visual to your space.
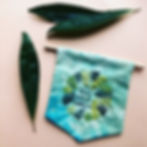
After creating my Positive Plants embroidery collection, I wanted to continue the series and add some variations to the designs. Along with adding a custom phrase option, I took some of these designs out of the hoop and turned them into pennants.
Want to turn one of your embroideries into a pennant? Here's how!
These are the supplies you'll need:
- Two 9x7 inch pieces of fabric
- Scissors
- Quarter inch wooden dowel cut to 8 inches in length
- Iron
- Sewing machine (optional, but will make the pennant flag construction process easier)
Sew, let's get making!
1. Cut 2 pieces of fabric to 9 x 7-inch rectangles. Then fold each rectangle in half (hot dog length) and cut the fabric 1-inch on a diagonal so that one side of the fabric is 9 inches and the other side is 8 inches long. When unfolded, the fabric should look like a pennant flag.
2. On the right side (the side with the front of the design) of one of the pieces of fabric, embroider a design. This size pennant flag works great with a 4-inch embroidery hoop. After the design is embroidered, iron both pieces of fabric.


3. Align both right sides of fabric on top of each other with the back of the embroidery on top. The fabric pieces should face each other.


4. Pin the edges of the fabric together, leaving the top edge un pinned. Pins should be perpendicular to the fabric edge with pin heads to the right of the sewing machine foot. Using a quarter (1/4) inch seam, sew along the right side of the fabric until almost at the bottom of the first angle. Take the pins out of the fabric as the seam is sewn. To turn the corner at each seam, leave the needle inserted into the fabric, lift the sewing machine foot, turn the fabric to align with the next fabric edge, and continue sewing. Do not sew along the top edge of the pendant flag.
If a sewing machine isn’t accessible, pin the edges of both fabrics together and mark a quarter inch seem with a fabric marker. (I like the DMC water soluble fabric pens). Using 2 strands of embroidery thread and the back stitch, sew along the seam line all the way around the fabric edge.
Backstitch: The backstitch creates a solid line and is good for hand embroidering text or outlining a design. Begin by pulling the needle and thread up through the fabric and do one stitch forward. Then leave a space the same size as your stitch and come back up through the fabric. Now fill in the gap by connecting the two stitches. Bring your needle back down through the fabric at the top of your last stitch. Repeat until your cactus is complete.


5. With the design still inside out. Trim the corner edges. This will help the flag have sharper corners. Then flip the fabric right side out and iron the design flat.


6. Next, pin the top of the pendant flag edges together and sew together with a quarter inch seam. This can be done on a sewing machine or by hand with 2 strands of embroidery thread and the backstitch.
7. Iron the top seam flat. Then fold the top seam a quarter inch down and iron it flat. Fold the ironed seam another quarter inch, so that the initial seam is hidden under the fabric. Iron flat again to press the seam.


8. Pin the pressed and folded seam. Thread the embroidery needle with 2 strands of embroidery thread. Knot the end and use the ladder stitch to attach the folded edge of fabric to the back of the pennant flag. Be sure not to bring the needle through the front of the fabric when attaching the folded over seam.
Ladder stitch: The ladder stitch joins two seams together in an invisible line. It is also great for hemming. Start by knotting the thread. With the tail end of the tread tucked under the folded seam, make a one eighth inch stitch into the fabric of the folded seam and pull the thread through. Then make a one eighth inch stitch into the flag back fabric. Continue making stitches, sewing on either fabrics, joining the two together, until the seam is complete. Pull the thread tight to completely join the two edges. Knot and cut the thread end.


9. Slide a quarter inch dowel through the top loop of the pennant flag.
10. Hang the pennant flag and enjoy!
Looking for more patterns and how-to designs? Check out the Supplies & Tutorials section on my blog!
Love pennant flags? Stitch yourself a rainbow pennant flag with this kit! Or join me for an online workshop.
Want a monthly embroidery surprise delivered to your inbox every month? Check out Pattern Club!
