

How to Revitalize and Repair Your Thrifted Wardrobe with 7 DIY Stitch Tutorials


Thrifting has become one of my obsessions. While I can't walk into a thrift store- I get way too overwhelmed by all of the choices- I do love shopping on resale apps like Depop. With Depop I can easily search for what I'm in the mood for and even barter over the price without feeling intimidated. I've found some of my favorite clothing pieces on the app, like a pink hand knit tank top, a cross stitched top with farm animals and flowers, a blue Susan Bristol cardigan with pink flowers, and so much more.
I will admit, the app has become a bit of an obsession. I need to hide it on my phone for periods of time because I have been known to go on a bit of a spending spree, but I don't feel too bad, because I always buy vintage (80s-90s) and I'm looking for clothing that will last.
With these pieces of clothing being anywhere form 30-50ish years old, they're not always in pristine condition, although surprisingly many are! Thankfully, my hand embroidery skills have been put to good use by stitching repairs to so that I can wear all of my wonderful finds and continue to have them last even longer. Want to learn how to repair your own clothing with a stitch tutorial?
Here's 7 tutorials you can use to repair your thrifted and vintage clothing with stitching.
Materials for Stitch Repairs
Each repair will be different, depending upon the garment. These are the materials I used for the garments mentioned below.
Repaired Clothes Stitch Tutorials
Below are seven items of clothing I thrifted and how I repaired them using hand sewing. Each repair uses a different stitching technique. You'll learn sashiko, cross stitch on knits, Swiss darning, woven mends on knits, honeycomb darn, how to resize a knit vest, and upcycling clothing with embroidery. Please keep in mind that all mends are unique and these tutorials cover the basics of each repair technique.

Sashiko Stitched Hem
I am one of those people who loves denim. Jeans are my go-to pants. I also hate shopping for them. So when I find a type of jeans I like, I try to buy multiples of them. While swiping the app, I found a pair of 'my jeans' for a steal so obviously I had to get them. When then arrived, I realized they were a bit longer than my other pairs, so I set about hemming them. To do this, I used sashiko.
How to hem jeans with sashiko:
I laid my old jeans on top of my new jeans and marked the difference in length. From there, I marked a 1/2 inch longer on the old jeans and cut along the half in mark with a rotary blade a ruler.
Fold and iron 1/4 inch, then repeat.
On a piece of Sulky Sticky Fabri-Solvy, I measured and drew a 1/4 inch grid using a heat erasable pen. I made my grid 1.5 inches tall and the length of the circumference of the pant cuff.
Peel off the backing and press the grid pattern sticky side down to the front of the denim, aligning the edge with the bottom edge of the pants.
Stitch your desired pattern using the running stitch with a sashiko thread and needle. I stitched the persimmon flower for my pants. Bring the needle in from the front of the fabric and leave a 6 thread tail when starting to stitch. Weave the thread tail into the back of the fabric when ending the thread.
Rinse the Sulky Sticky Fabri-Solvy out with warm to hot water.
Cross Stitched Cardigan Mend
I'm a huge fan of vintage Susan Bristol clothing and own a handful of her early 90 designs. One such design is a periwinkle cardigan with pink flowers and cross stitch accents. After this sweater arrived, I realized this 1991 treasure had slight discoloration on the inside of both sleeves. While I was disappointed, I knew I could add some stitching to cover it up because the cross stitch details could be similarly replicated.
How to cross stitch a knitwear:
Choose thread similar to the garment being stitched. My cardigan was cotton, so I picked Cosmo 6 strand cotton embroidery thread.
Measure an arm's length of thread and thread a tapestry. Do not knot the thread end.
Work in rows across from left to right. Bring the needle up below the row being stitched, leaving a 1/2 inch thread tail along the back. The needle should come up through the hole in the knit, not through the yarn.
Stitching from bottom left to upper right, stitch the diagonal stitches over one row of stitches, catching the thread tail on the back of the fabric.
Once the first row is complete work backwards, stitching the bottom right to upper left diagonal stitches.
Move up to the next row after the first row is complete.
Weave in the tail end when the stitching is complete.
Swiss Darn Cardigan Patch
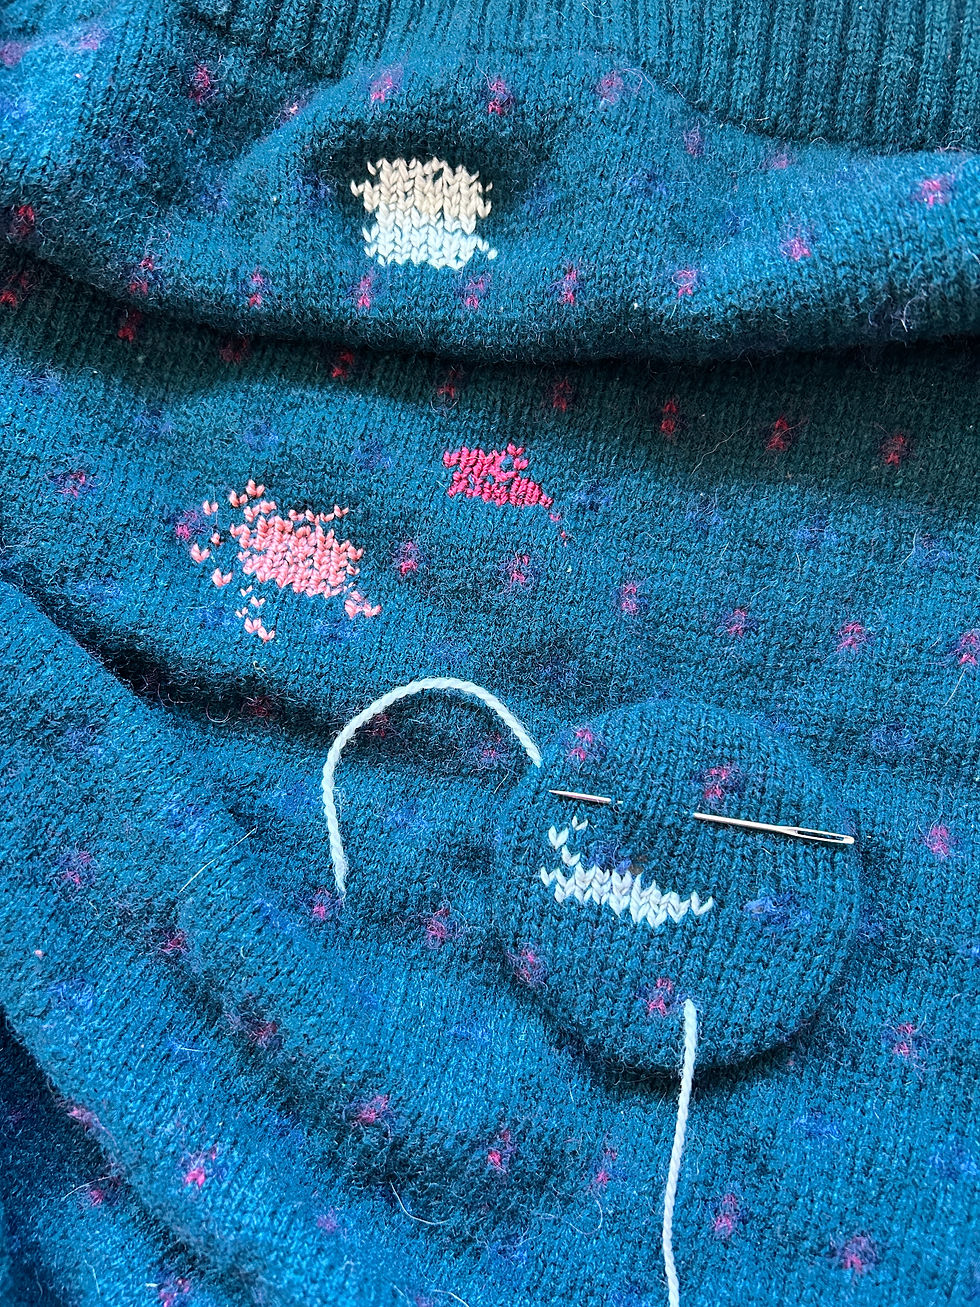
If you took a peek into my closet you would think I have a thing for late 80s to early 90s Eddie Bauer wool sweaters. You wouldn't be wrong. I love them! My favorites are ones with animals, like a black duck with a red ribbon around its neck. One such wool sweater I scooped up for $5 (a true steal!) arrived at my doorstep with a bunch of holes all over it. The more I looked at the sweater, the more holes I found... It was $5 after all. Thankfully this style of sweater lent itself to Swiss darning mending and I had just the right thread colors to add delightful pops of color.
How to swiss darn knits:
Choose a thread similar to the garment being mended. My sweater was 100% wool. I didn't have any 100% wool thread, so I used Storyteller Stitcher 2-ply thread that was 75% merino and 25% silk.
Measure an arm's length of thread and thread a huck embroidery needle. Do not knot the end of thread.
I placed the wooden disk of my speed weave loom under the area I was working in the used a rubber band to secure it in place, but you could also use a darning egg or mushroom. Insert the needle on the front of the fabric 1/2 away from the edge of the hole, leaving a 5 inch thread tail.
Bring the needle up through the fabric at the base of the stitch being duplicated. Come up through the hole, not the thread. Slide the needle under the stitch above where the thread is coming out of the fabric. Insert the needle into the fabric at the starting point.
Slide the needle under the base of the stitch to the left of the stitch that was duplicated. Repeat, working in a horizontal line.
Work in a zig-zag fashion to add additional lines above the original line.
Weave in the tail ends when the stitching is complete.
Woven Hole Armpit Mend
Another one of my Susan Bristol finds was this lovely white shirt with crochet detailing. Unfortunately, upon arrival, I found out it had a hole in one of the armpits. But that's nothing that couldn't be fixed with a woven mend!
How to mend a hole with a woven mend:
Choose a thread similar to the garment being mended. My shirt is 52% acrylic and 48% cotton. I didn't have a thread that was a similar blend, so I went with a DMC 6 strand cotton embroidery thread in a cream white color.
Measure an arm's length and thread a tapestry needle. Do not knot the thread end.
Please a darning egg or mushroom in the center of the whole.
Bring the needle in from the front of the fabric about 1/2 inch away from the bottom corner of the damaged area. Use the needle weaving stitch to fill the area.
Weave in the tail end. Bring the beginning thread to the back and weave it in as well.
Honeycomb Darn Patch
My ideal clothing aesthetic is 90s kindergarten teacher. I like functional, playful, and quality clothing. Apparently Mrs. Wilder, my kindergarten teacher had a big impact on me! Anyone else remember raising baby chicks, having a full size play house, doing all the crafts, and popping popcorn in their kindergarten classroom? Or was that just me? Anyways, I found a playful navy blue Laura Ashley romper with purple flowers on it that fit this aesthetic. The only thing it needed was a little TLC in the thigh area where the fabric was very thin and worn.
How to honeycomb darn:
Choose a thread that is similar to the garment being mended. My romper is corduroy, which is spun cotton, so I used DMC 6 strand cotton thread in a navy blue color.
Measure an arm's length of thread and thread an embroidery needle. Do not knot the thread end.
Place a darning egg or mushroom in the center of the area being mended. If the area is larger than the egg or mushroom, the garment can be placed in an embroidery hoop, but it shouldn't be stretched too tightly.
Insert the needle on the front of the fabric about 1/2 inch away from the edge of the hole/ where the fabric isn’t worn, leaving a 5 inch thread tail.
Hold the thread towards the worn area, then bring the needle down through the fabric 1/4 inch to the right of the previous stitch (if left handed, work to the left), creating a loop of thread on the front of the fabric. Bring the needle up through the loop, tugging gently towards the worn area so that the thread is is flush with the fabric.
Repeat adding the next piece to the honeycomb.
Once the first row is stitched, the proceeding row bases will be aligned with the top of the previous rows. If there is no fabric to stitch through, continue the stitch without the fabric. Tug the thread so that it is flush with the previous row, creating a tighter weave. The mend is complete when the area has a spiral honeycomb design that fills in the patched area.
Weave in the tail end. Bring the beginning thread to the back and weave it in as well.
Resizing a Knit Vest
Sometimes buying things from pictures alone means they don't fit as you think they will. This has happened to me on occasion, especially when it comes to knit vests, which I like to wear as tops during the summer. Thankfully I have become somewhat adept at resizing these to fit!
How to resize a knit vest:
Put on the vest inside out and pin the amount that needs to be taken in on each side. Take off the vest and measure each side to make sure these measurements are the same. Adjust as needed. I usually pin just the top mark while wearing the garment, then lay the garment flat, measure, mark, and pin the rest of the garment to ensure it is even on both sides.
Lay the garment flat (still inside out). Use a ruler and chalk pencil to mark a line 1/4 inch away from the new seam.
Choose a thread that is similar to the garment being mended. For this knit I used DMC Eco Vita thread.
Measure an arm's length of thread and thread a tapestry needle. Do not knot the end of thread. Use the Holbein stitch to stitch along the marked line, catching the thread tail with the first few stitches.
Trim away the excess fabric about 1/4 inch from the stitched line.
Measure an arm's length of thread and thread a tapestry needle. Do not knot the end. Weave the starting thread into the back of the Holbein stitch. Use the buttonhole stitch to stitch the edge. Start the stitches along the Holbein stitches. Stitch along one side, then flip the garment over and stitch back along the other side, placing the second row of buttonhole stitches between the first row.

Upcycle with Embroidery
Sometimes old clothing has stains or holes. They could be mended with darning, sashiko, or woven mends, but upcycling with embroidery is an extra special way to create a truly unique piece of clothing.
How to upcycle with hand embroidery:
Lay the garment flat. Choose a stick and stitch pattern. Peel off the backing a press it sticky side down to the front of the garment. Ensure the center of the pattern or the portion of the pattern with the most of the embroidery is covering the stain/hole.
Place the garment in an embroidery hoop. Do not overly stretch the garment. Use these helpful tips.
Choose threads similar to the garment being mended. My garment was wool so I used Tilli Tomas Essentials 50/50 silk and merino blend needlepoint thread.
Measure an arm's length of thread and thread an embroidery needle. Do not knot the end.
Start each thread using a covered thread start, use short stitches to fill in your chosen designs, and end the thread by sinking it. For my snail body and shell I used the long and short satin stitch. I outlined the shell with the stem stitch. I used the split back stitch for the main stem branch and the filled lazy daisy stitch for the leaves. You can find more stitch tutorials on the MCreativeJ embroidery stitch guide.
Remove the embroidery from the hoop and rinse away the stick and stitch pattern with warm to hot water. Do not scrunch the embroidery. Lay it flat or hang to air dry.
If desired, cut a piece of iron-on stabilizer such as Sulky Tender Touch slightly larger than the embroidery and iron it to the back of the embroidery once it is dry.

Looking for more helpful embroidery tips, supplies, and hands-on workshops?


Workshops
Join Melissa Galbraith of MCreativeJ for a hands-on workshop! Melissa makes hand embroidery easy with a wide variety of embroidery classes. Classes are beginner-friendly to advanced and will walk you through various stitches, techniques, and designs.


Embroidery Books
Want a great hand embroidery reference? Try one of Melissa's hand embroidery books! Each book is great for beginners and breaks down materials, stitches, techniques, and projects for you.
*** Thanks for reviewing my recommendations. This post contains affiliate links. Should you purchase an item listed, I may receive a small portion of the sale.


Comments